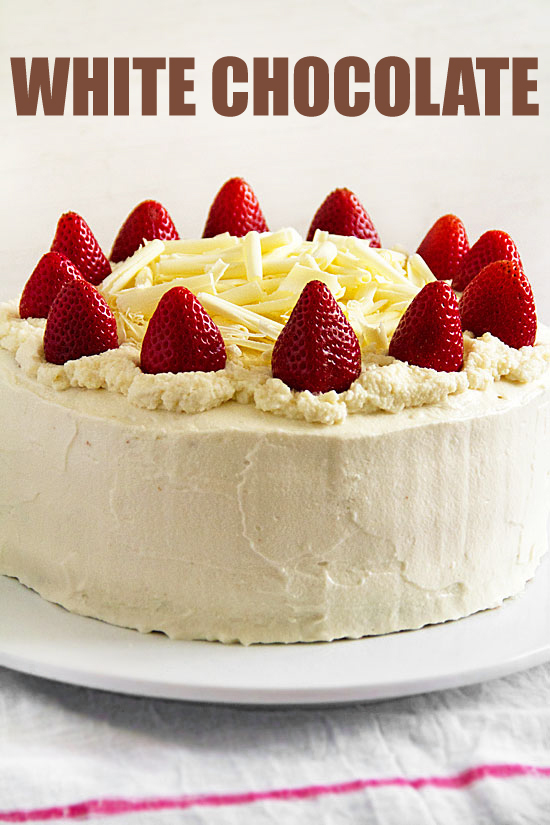
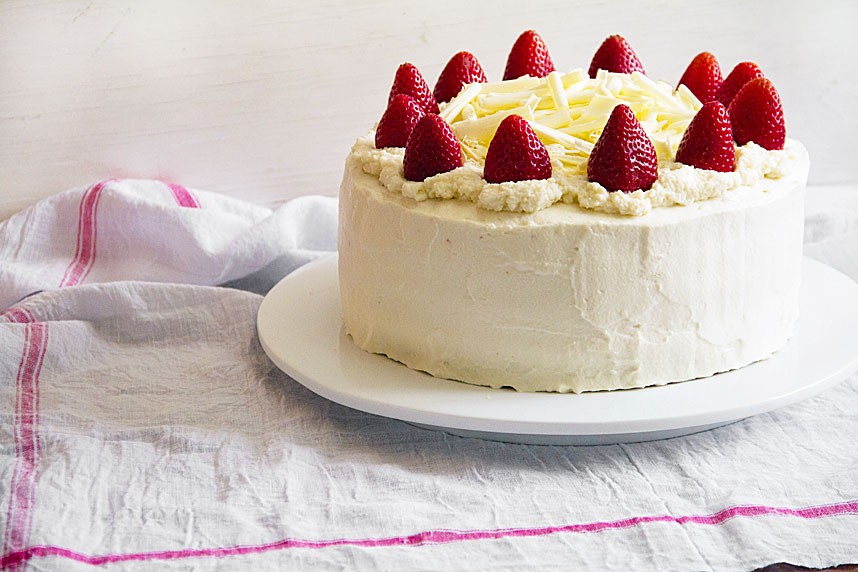
I don’t like cake decorating. It’s not that I don’t like decorated cakes it’s just that I find all the tips and techniques necessary to master cake decorating to be tedious (or perhaps simply beyond my skill level). Still there are times in your life that call for cake. I’ve tried birthday pies and anniversary Rice Krispies Treats and have noted the crestfallen faces around the table. I get it. Cookies with candles are a no-go. So to keep the birthday boys and girls in my life happy – and to avoid tedium in my own – I’ve learned how to make chocolate curls. They’re all the decoration this Orange-Scented White Chocolate Cake with Strawberries needs.
How to Make Chocolate Curls
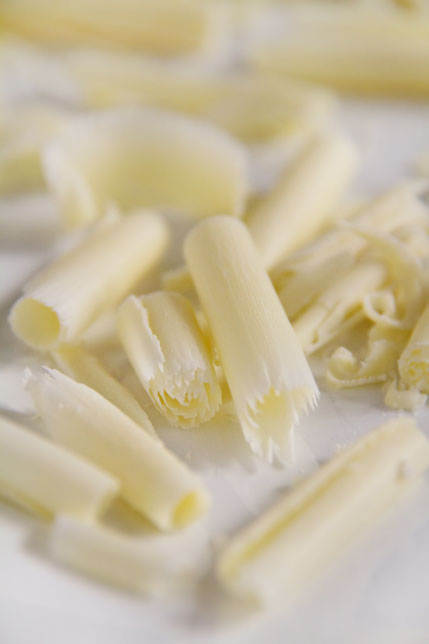
Chocolate curls are easy to make. They dress up a cake in a simple yet sophisticated manner. They look sensational pressed into the sides of a frosted cake. There’s some tedium involved with this direction, so I typically prefer a big luscious mound of chocolate curls piled onto the center of the cake. The more curls you pile on the more festive the occasion.
There are several methods I’ve discovered to make chocolate curls. The most professional chocolate curls are made by tempering chocolate, or purchasing specialized modeling chocolate and pouring it onto the back of a sheet pan. Knives or specialized tools are used to form big, soft curls. The result is impressive, but the process is (guess what?) tedious.
For me the best (least tedious) way to make chocolate curls is to use a stainless steel vegetable peeler and a big brick of chocolate.
There is a learning curve, but it’s in no way tedious. First find a peeler with a swivel blade. It really makes a difference in just how curly your chocolate curls turn out.
Really good curls are made with a good-sized block of chocolate, so you’ll need to get yourself a good hunk from a gourmet shop or baking supply store. Choose something between 8 and 10 ounces. This is way more chocolate than you’ll need for the curls in this white Chocolate Cake, but the large size will give you a lot more grip and a lot more control. The chocolate doesn’t have to be thick, but if you want big curly curls, thicker is better. An inch to an inch and a half will give you respectable looking curls.
After you’ve chosen an appropriately sized piece of chocolate the only real trick you need to know concerns temperature. To check the temperature, try making a few curls. If the chocolate is too cold and hard the chocolate will flake rather than curl. If the chocolate is to warm and soft, the chocolate will clump and get stuck between the blades of the peeler. When the chocolate is just the right temperature well-formed curls easily roll off the block. Keep in mind that white and milk chocolate are softer than dark chocolate, they should be ready to make chocolate curls practically at room temperature. If not hold the chocolate between the palms of your (gloved) hands for 2 or 3 minutes. Darker chocolate or curls made on chilly days may require some heat to get the block to just the right temperature. I find that a 3 to 4‑inch chunk of chocolate will lightly soften in the microwave on low (30% power) in 5‑second intervals until it’s barely warm.
When you’ve gotten the chocolate temperature just right and you’re ready to make chocolate curls hold the block of chocolate in one (gloved) hand. Moving the peeler away from yourself scrape the curls from the block in a single layer, using a long, slow stroke of 1 1/2 to 2 inches. Let the curls fall onto a parchment-lined tray. After a while you’ll find that you begin to form a divot in the chocolate that may make additional curls more difficult. When this happens simple turn the block to a fresh side and continue. When the block of chocolate becomes to small or oddly shaped to make chocolate curls, save the remaining chocolate for another use.
The curls will vary in shape and size. I find that a slight shake of the pan will allow the small unattractive bits and pieces settle to the bottom of the pile leaving the bigger more well-formed curls more visible. At this point put the tray into the freezer for about 30 minutes. When you’re ready to decorate use a slightly chilled spoon to place the curls onto the top (or sides if you’re very patient) of your frosted cake. If you’re particularly anal (and who isn’t) you can save the nicest looking specimens for last. I like to use a long wooden skewer to place the last few crowning curls in just the right place. Remember your body heat will melt a chocolate curl almost instantly.
That’s how you make chocolate curls! GREG
Orange-Scented White Chocolate Cake with Strawberries
Print This Recipe Yield 12Source Adapted from Elinor KlivansPublished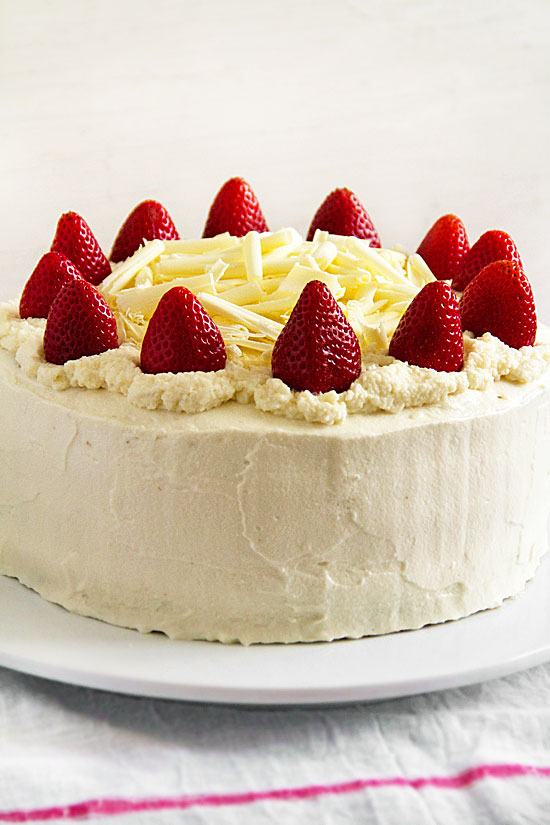
Ingredients
- 1 cup whole milk
- ½ cup unsalted butter cut into 8 pieces
- 16 ounce chopped white chocolate (divided)
- 2 cup all-purpose flour (scooped and leveled)
- 2 teaspoon baking powder
- 1 teaspoon kosher salt
- 4 eggs (at room temperature)
- 1 3/4 cup granulated sugar (plus 2 teaspoons)
- 2 teaspoon vanilla extract (divided)
- 2 teaspoon finely grated orange zest
- 2 cup cleaned, stemmed, and chopped strawberries
- 4 cup cold heavy whipping cream
- ¼ cup powdered sugar
- 2 cup white chocolate curls (optional)
- 12 large whole strawberries (cleaned and trimmed)
Directions
Make the white chocolate cake: Position a rack in the middle of the oven. Preheat the oven to 350 degrees F. Butter the bottom and sides of two 9‑inch pans. Line the bottom of each pan with parchment paper and butter the paper.
In a medium saucepan, heat the milk, butter, and 8 ounces chopped white chocolate over low heat. Use a large spoon to stir constantly until the butter and white chocolate are melted and the mixture is smooth. Set aside in a warm place.
Sift the flour, baking powder, and salt into a medium bowl and set aside.
In a large bowl use an electric mixer on medium speed to beat eggs and 1 3/4 cup sugar until light and thick, about 3 minutes. Stop the mixer and scrape the sides of the bowl as needed during mixing. Mix in the vanilla and orange zest. On low speed, mix in the flour mixture in three or four divisions until incorporated. Slowly add the hot milk and white chocolate mixture and continue mixing until the batter is smooth, about 30 seconds. Pour the batter into the prepared pans, dividing it evenly.
Bake the cakes until the tops feel firm and a toothpick inserted in the center comes out clean, about 35 minutes. Cool the cakes for 10 minutes in the pan on a wire rack.
Use a small sharp knife to loosen the cake from the sides of each pan. Place a wire rack on the top of each cake and invert it onto it. Carefully remove and discard the parchment paper. Allow to cool completely. You can make the cake 2 days ahead to this point. In which case carefully return the cooled cakes to the pans and cover with plastic wrap. Store at room temperature.
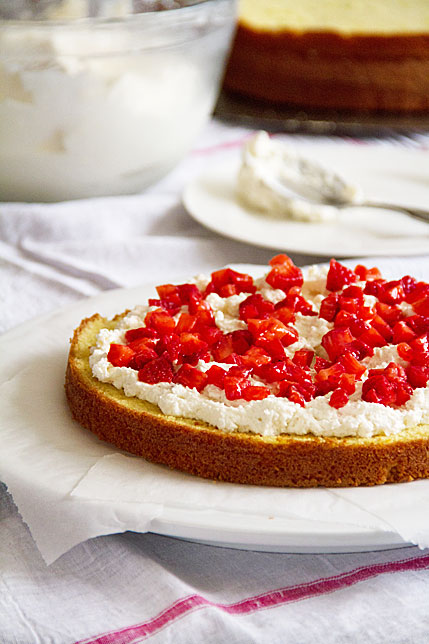
Make the frosting. In a large bowl, stir the chopped strawberries and remaining 2 teaspoons granulated sugar together. Let sit for 15 minutes.
Put remaining 8 ounces chopped white chocolate in a heatproof bowl or the top of a double boiler and place it over, but not touching, a saucepan of barely simmering water (or the bottom of the double boiler); the water should not touch the bowl. Stir constantly until the white chocolate is melted and smooth. Set aside to cool slightly.
In a large bowl use an electric mixer on medium-high speed to beat the cream, powdered sugar, and vanilla until firm peaks form.
Put the melted white chocolate into a large bowl. Whisk about 1 cup of the whipped cream into the melted white chocolate. Use a rubber spatula to fold the remaining whip cream into the white chocolate mixture.
Use a long serrated knife to cut both of the cooled cakes horizontally into four even layers. Use the removable bottom of a tart pan to lift up the top halves of the cakes and move them to the side
Place one of the layers on a serving platter. Tuck several parchment paper strips just an inch or so under the bottom of the cake all the way around to keep the plate clean.
Drain any juice from the reserved chopped strawberries.
Leaving a ½‑inch plain edge, spread about 1‑cup of the frosting over the bottom layer of the cake. Spread ⅓ of the drained, diced strawberries over the frosting as evenly as possible. Slide a second layer carefully over the strawberry covered frosting, centering it over the bottom layer. Spread this second layer with another 1‑cup of frosting and half the remaining strawberries.
Repeat the process with a third layer using 1‑cup of frosting and all the remaining diced strawberries, then place the final cake layer on top.
Chill the cake at least 1 hour before continuing. You can make the cake one day ahead to this point. Cover carefully and refrigerate overnight.
To finish the cake: Use a thin metal spatula to spread all but about 1‑cup of the frosting over the top and sides of the cake in an attractive manner. Use the remaining 1‑cup frosting to make a decorative mound on top (optional). Arrange the whole strawberries around the top of the cake in a decorative manner. Spoon the white chocolate curls into the center of the cake (if using). Carefully remove the paper strips and discard them. The cake can be covered and refrigerated overnight.
Yes, please. My birthday is August 26, and I would be happy to come over for some of this cake! It is a work of art — not overdecorated. Simple. Elegant.
I am with you on perfectly frosted decorated cakes..I love how you’ve made this cake. It’s a perfect way to celebrate. White chocolate is a perfect one.
Now that’s a birthday cake! I’m with you on decorating. I’m never very good at anything that calls for precision. The only thing I had success with that wasn’t a birthday cake, were giant chocolate chip cookies made in a large round pizza pan. The kids loved for me to bring those to school. I did decorate those with awful spray cans of colored frosting. The gaudier the better, as far as they were concerned!
It’s so mouthwatering! It looks like a perfect birthday cake! And you have great explanation of how to form chocolate curls. I just can’t stop looking at it. The flavor is wonderful! Really delicious!
That’s a really lovely looking cake! It’s drool-worthy. 🙂
These are gorgeous, I need to find a big hunk of chocolate to give them a try — I’ve made the mistake of trying to use those little Baker’s squares in the past (ouch!)
Congratulations on making this great looking cake. I hope the birthday person appreciates all the effort that went into make in this cake. Your chocolate curls are perfect. Thanks for the tip.
Greg this cake is beautiful! I love those curls and I love this flavour. Such a lovely treat!
I can’t stop looking at that cake.
This looks like a wonderful birthday treat. I like your explanation of how to form chocolate curls. The next time I come to the southland I am looking you up so we can Bake!