“A Red Velvet Cake makes the heart young again and wipes out the years.”
That’s a quote I found on the internet, so it must be true.
Here’s another quote from another reliable source, actress Emma Stone:
“You’re a human being, you live once and life is wonderful, so eat the damn Red Velvet Cake.”
These quotes seem to validate everything I want to believe about Red Velvet Cake. After all, a cake that red just has to be magic, right? Well if you’re talking about marketing magic– then yes, this cake has it all.
That’s because the crimson hue of this Red Velvet Cake comes from plain old food dye. Red food dye, naturally.
Which sort of belies this cake’s storied reputation. Urban myths flutter around this cake. I’ve heard it given all sorts of romantic provenance. The main story concerns the chef at The Waldorf Astoria and a vindictive customer. But that story isn’t true, so I won’t bother to repeat it here. Still, if you grew up in the south, where this cake is practically revered, then you might believe that a Red Velvet Cake contains some sort of magic happiness potion.
But the truth is Red Velvet Cake was invented by the folks at the food coloring company Adams Extract during the Great Depression. It was nothing more than a magical marketing scheme with the tagline: “The cake of a wife time.”
Now, I’m not a woman– but in my opinion the only thing miraculous about that phrase is the fact that it didn’t land those marketing geniuses flat on the kitchen floor. What kind of wife would want to make a cake with that sort of incentive?
It’s easy to make fun of Red Velvet Cake and its miraculous red food dye. But the truth is– the magic in this cake comes in the not too sweet alchemy of cocoa powder and vinegar. The red food dye is just for marketing magic. However, it’s the part that does indeed “make the heart young again.” GREG
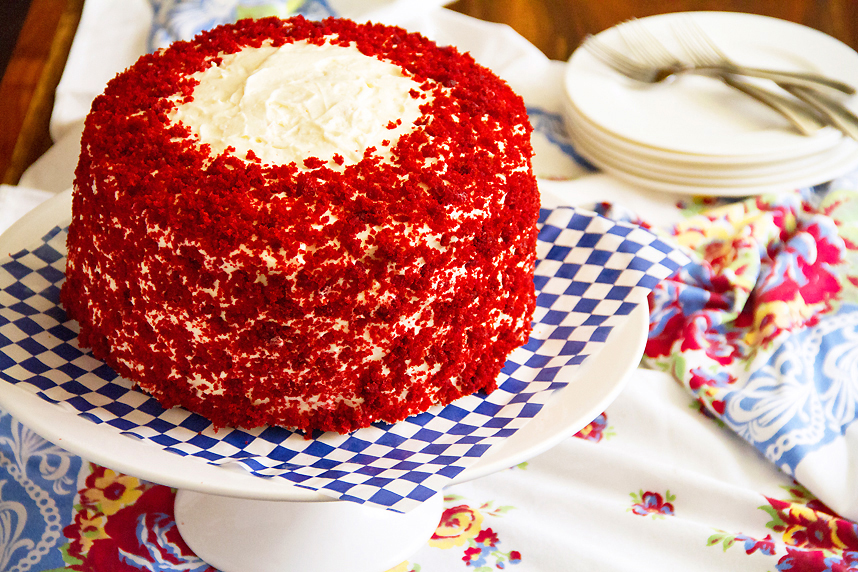
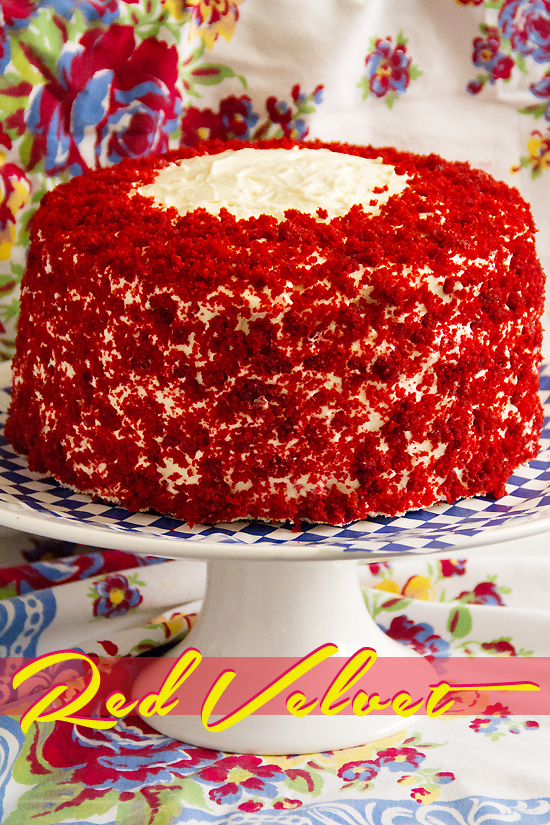
You can make this a dramatic 5‑layer cake (as I did) if you double the recipe and make 6 thin layers. Use the 6th layer as a crumbled topping.
Ingredients
- cooking spray (as needed)
- 2 ½ cup all-purpose flour (plus more for dusting)
- 1 ½ cup granulated sugar
- 2 tablespoon unsweetened cocoa powder
- 1 teaspoon baking soda
- 1 teaspoon kosher salt
- 1 ½ cup vegetable oil
- 1 cup buttermilk
- 2 large eggs (at room temperature)
- 1 ounce red food coloring
- 1 teaspoon white vinegar
- 2 teaspoon vanilla extract (divided)
- 16 ounce cream cheese (at room temperature)
- 1 cup unsalted butter (at room temperature)
- 2 cup powdered sugar
Directions
Make the cake: Preheat oven to 350 degrees. Lightly coat the bottoms and sides of two or three 9‑by-2-inch round cake pans with cooking spray. Depending on whether you want 3 thin layers or two standard layers. Line with parchment paper, and spray again. Dust with flour, and tap out the excess; set aside.
In a medium bowl, sift together flour, granulated sugar, cocoa, baking soda and salt; set aside.
In a large mixing bowl whisk oil, buttermilk, eggs, food coloring, vinegar, and vanilla, scraping down the sides of the bowl, until well combined.
Stir the dry ingredients into the wet ingredients in several additions, until the batter is smooth.
Divide batter between prepared pans, and bake until a cake tester inserted into the center comes out clean, 18 to 20 minutes for three pans or 20 to 25 minutes for two pans. Remove pans from oven, and transfer to a wire rack to cool, about 15 minutes. Turn cakes out onto rack; let stand until completely cool.
Make the frosting: Meanwhile place cream cheese and butter in the bowl of a stand mixer fitted with the paddle attachment. Mix at medium speed until creamy, approximately 2 minutes.
Lower the speed, then with the motor running, pour in the vanilla and mix for 30 seconds. Add the powdered sugar, a little at a time and mix until smooth. Return the speed to medium and mix approximately 2 minutes. Use right away or refrigerate in an airtight container for up to 2 days.
Frost the cake: Using a serrated knife, trim tops of cakes so surfaces are level. Save the scraps for decorating the cake if you like. Place a layer on a cardboard round or directly onto a cake stand. If working directly on a cake stand tuck strips of parchment, in an easy to remove manner, around the perimeter of the cake to cover and protect the stand from messy frosting. Spread about ⅓‑inch of the frosting over top. Place the second and/or third layer on top, and spread with ⅓‑inch, saving the remaining frosting frosting for the sides and finishing touches of assembled cake.
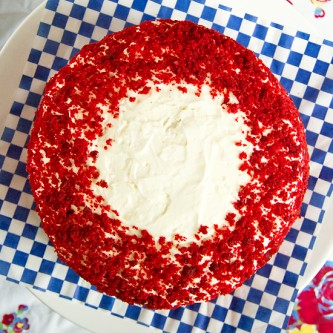
Crumble the reserved cake scraps with your hands and sprinkle them decoratively on the sides and top of the cake (optional).
Transfer to refrigerator, and chill until ready to serve.
That’s a very pretty cake, but I think you left the oil out of the ingredients list. 🙂
I think red velvet is just plain fun! (I have the same floral tablecloth, which by the way, looks perfect with that cake!)
I have a hard time liking Red Velvet cake for one reason and tis a silly one. I worked in the risk management department of a large grocery chain. A woman bought one from our bakery, dropped it on her carpet and wanted us to pay to have it cleaned because the stain wouldn’t come out. Her “reasoning” was that we shouldn’t be using such a strong dye in food. Ummmm okay.
But perhaps enough time has passed that I can try just a sliver of yours, Greg. Be careful.…don’t drop it 🙂
Cake of a what-time? Hmm. I’m not sure beauties like this need a marketing department. I love how you decorated this, too!
I always like this cake, mainly, I suspect because of its color. The flavor is good, but not extraordinary. Although I’ll never turn down a piece! And I do really like the color. But “cake of a wife time?” Beyond lame.
I have always loved this cake, perhaps because it was always for special occasions. Love the story behind it and as for Emma Stone — well, I suppose she can say that because she LOOKS like Emma Stone! I should be so lucky! However I would be so happy to wipe away the years. I’ll have just a sliver. Please!
Greg, your cake is a real beauty. Buuuuuut … call me an old hippie chick, but I cannot do food coloring. I just can’t. After a lifetime of eschewing all things artificial and chemical, I could not / never have / never will try even a bite of red velvet cake. However, if I decide to make one *minus* the food coloring, I’m going to make *your* recipe! I like the way you decorated it with crumbs.
Sadly, Red Velvet Cake w/o the red is Gray Velvet Cake and it loses the magic. GREG
Not only have I never made a red velvet cake, but I’ve never even tasted one! Being from the Northeast its not a cake we see often, though I must say that red velvet cupcakes seem all the rage these days. Love the crumb coating you gave this lovely, very pretty indeed.
this is my favorite cake! it looks great!
I love love love‑a–dove-dove red velvet cake. Fake coloring and all.
Your southern roots are showing, Greg! Beautiful version of a classic!
i am so craving a slice of red velvet cake right now! looks seriously delicious.
I love that you made red velvet in the summer! I usually only see it before Xmas or Valentine’s. I would love a big slice of this now!
Where I grew up it’s always hot, so this cake had no season. GREG
I love me some red velvet cake. It is magical, and your crumb decoration is beautiful. My favorite version was the groom’s cake in Steel Magnolias.
This cake is magical. I want it for my birthday.
I can totally vouch for the popularity of red velvet cake here in the South. People go CCCCCrazy for it. Even bad red velvet. Of course, mine isn’t bad and its divine. Cake of a wife time. I’m on the floor with that one. Mainly cause it turned out to be true. LOL.
This cake is gorgeous Greg! I love the reserved cake scraps crumbled on top — so pretty!
I’ve always had an irrational fear of red velvet cakes…now I am really curious and must make one!
I have only ever had red velvet cupcakes, but they alone are worth duplicating. This is a time honoured recipe worth repeating over and over.
Yes yes yes. I love this cake so much. I love what you said about it. I love the picture of it. Your blog makes me happy often, and I neglect to say so. This celebration of one of my favorite and oft-maligned cakes reminds me to tell you so. Happy summer and keep rocking the red.
My great grandmother would make this every year for me for my birthday growing up. This cake is always very special for me and I often make it for myself now. It is a little fussy, but sooooo worth it. Yours looks beautiful!