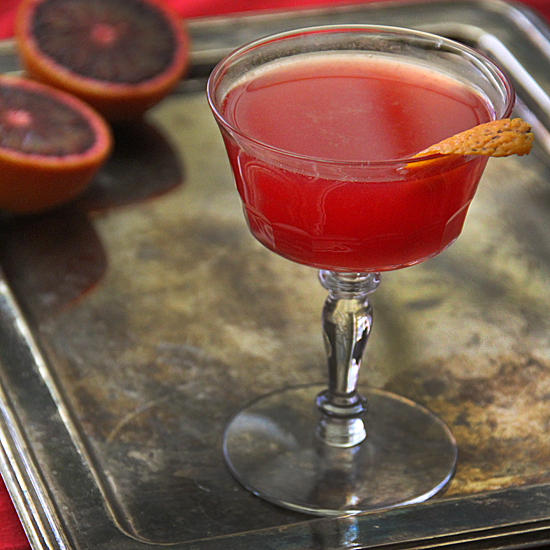
Spring

green garlic pesto prep

The Hollywood Farmers Market is in transition. It's a really good time in my opinion for the market. No longer the first blush of spring, but the heat (and abundance) of summer is still a few months away. Which means there's a lot to look at and even more to consider.

You can still find favas and sweet peas. But the first of the stone fruit are starting to make an appearance too. See what I mean? Some of this and some of that. Somewhere between spring and summer. And though the market is indeed evolving with the  seasons, two of my springtime favorites can still be found. Green garlic and spring onions.

At first glance these two vegetables appear sorta similar. They look like a crude cousin of a scallion. A bit bigger, a bit leafier and slightly bulbous. But what they are really are just younger versions of onions and garlic. These vegetables are harvested early and sold fresh without the curing process that develops the dry papery skins. Green garlic and spring onions also are sold with the greens attached, which are edible. In fact they are delicious and I usually use almost all of the greens when I work with these vegetables.

Choosing both green garlic and springs onions is easy. Look for crisp tops and white, pink or purple bulbs. Once you get them home you can slice them and use them as you would a scallion. They both have milder flavors than their more mature versions and are best when used in dishes that highlight their delicacy.

Sippity Sup Continues »
zucchini

For this week's Market Matters, I went to the Ojai Farmers Market instead of the Hollywood Farmers Market because I spent a wonderfully quiet weekend there, just plain relaxing at the Ojai Valley Inn and Spa. More coming about this weekend soon.

When I arrived home I was tired, feeling lazy (in that way only a weekend at a spa can bring) but hungry. I looked in my bag and saw zucchini. So, it's zucchini soup for dinner. But there are many versions of zucchini soup. I needed a soup to fit the season. Most of the zucchini soup I have enjoyed have really been summer soups. Probably because zucchini is such a 'summer food'. Every gardener in the world knows about late season zucchini. Big like nothing else in the garden. They are prolific and seem to come from nowwhere just as other things in the garden are slowing down. Typically these summer zucchini soups are served cold and creamy.

But this time of year I prefer hot soups. And though zucchini from the garden and at the Farmers Market hasn't peaked as prodigiously as it will within a few months, you can usually find smaller more delicately flavored specimens. They are perfect for simple soups with just a few ingredients. For me this is a 'no cream necessary' soup– even though sour cream or yogurt are fairly traditional in zucchini soup. But I find that yogurt, certainly, and even cream can overpower the taste of baby squash this time of year.

Sippity Sup Continues »

Roast Zucchini Soup with Mint

Zucchini Soup
Prep time: 60
Yield:1 ()

Ingredients:

  • 2 lb baby zucchini (6 to 8-inches) cut in quarters lengthwise
  • 1 lb spring onion or sweet onion, such as vidalia or maui, cut into 1-inch chunks
  • 2 T olive oil
  • 0 salt and pepper, as needed
  • 0 a small handful of mint leaves, rolled tightly, then cut into thin strips (chiffonade), plus more whole leaves as garnish
  • 4 c chicken broth (may substitute vegetable broth)
  • 2 T tablespoons freshly grated parmesan cheese

Directions

Preheat the oven to 375 degrees. Combine the zucchini, onion, oil, salt and pepper to taste in a large shallow roasting pan; toss the vegetables to coat evenly, and spread them in as close to a single layer as possible. Roast for 30 to 35 minutes, turning the spears once, until the vegetables have browned somewhat and are tender. Remove from oven. Toss the mint chiffonade all over the vegetables and cover with aluminum foil and let sit for 25 minutes. Meanwhile, bring the broth to a boil in a medium sized pot over medium-high heat, then reduce the heat to medium-low and add the roasted vegetables. Cook for 10 minutes, adjusting the heat to keep the liquid just below a boil, break the zucchini spears up with a wooden spoon as they cook. Remove the soup from the heat and let it cool slightly. Use an immersion blender to achieve a slightly chunky soup. Add 3 tablespoons of the cheese. Season to taste. Serve warm with a garnish of mint leaves, if desired; or for optimum flavor, refrigerate for no more than 2 days. Reheat to warm and serve– garnished.

Notes:

serves 6

Tuna Tataki Vietnamese Summer Rolls

Tuna Tataki Vietnamese Summer Rolls
Prep time: 10
Yield:1 ()

Ingredients:

  • 0.25 c honey
  • 2 T apricot jam
  • 1 c warm water
  • 3 T fresh lime juice
  • 3 clv garlic, peeled and minced
  • 2 T asian fish sauce
  • 1 t prepared chili-garlic sauce
  • 12 rice paper wrappers
  • 0 butter lettuce torn into bite size pieces as needed
  • 0 assortment of vegetables such as cucumber, carrots, diakon cut into matchsticks, as needed
  • 0 mint leaves and sprigs as needed
  • 0.5 lb tuna tataki, thinly sliced on an angle

Directions

Make the dipping sauce: Mix together the honey and apricot jam in a small bowl. Slowly stir in the warm water, continuing to stir until well-combined. Add the remaining ingredients and stir to combine. Taste and add more water as desired to adjust the strength of the sauce. Make the summer rolls: Start by dipping a rice-paper wrapper in warm water for about 5 seconds. Long enough to slightly soften, but not so long that they tear or become difficult to work with. You will notice that they begin to get pliable and transparent. This is your indicator that they have been in the water long enough. They will continue to soften after they leave the water, so don't over soak them. Getting a picture perfect roll starts with a solid base. Begin by laying the moistened wrapper onto a plate or work surface. Lay 3 or 4 lettuce pieces, about 1/4 cup matchstick veggies, and a few mint leaves in a small elongated pile at the bottom third of the wrapper, centered side to side. Getting a tight roll depends on this step, so make sure to arrange these ingredients into a firm cylinder. The exact size depends on the wrapper you are using and should be about half of the overall diameter. Fold each side of the wrapper inwards, meeting in the center. Fold the bottom flap of the cylinder up and over the ingredients. Creating a vertical rectangle with a rounded top. Be precise with your folds. They are hard to redo due to the sticky nature of the wrapper. Working from the bottom, maintaining a neat uniform shape, roll the wrapper 1/2 turn so that the lettuce and veggies are facing up. Place 2 or 3 slices of tuna tataki and a few more veggies and sprigs of mint in a line just above the wrapped cylinder of rolled ingredients. Keep in mind that these are the ingredients that will have a window on the world so choose them well and arrange them artistically. You may trim the ingredients to fit inside the roll, or you may let them overhang one or both sides, depending on your presentation and aesthetic. Continue to roll the rest of the way. If you come across any stiff sections of the rice-paper, simply moisten them with a wet finger, and do the same for the final edge to seal it. Repeat with the other wrappers. Serve them whole or cut in half with lemon wedges and dipping sauce on the side.

Notes:

makes 1 Tuna Tataki may be purchased online at www.ILoveBlueSea.com Source: Adapted from La Fuji Mama

Norwegian Orange Cake

Norwegian Orange Cake
Prep time: 120
Yield:1 ()

Ingredients:

  • 1.5 sticks butter
  • 1 c sugar
  • 3 large eggs
  • 0 zest of 1 orange
  • 0.333333 c plus 2 tablespoons orange juice, divided
  • 1.33333 c flour
  • 1.5 t baking powder
  • 3 oz dark chocolate (preferably 70%), finely chopped
  • 0.75 c powdered sugar
  • 0 candied orange peel as garnish

Directions

Heat the oven to 350 degrees. In the bowl of a stand mixer using the beater attachment, or in a large bowl using a hand mixer, beat the butter and 1 cup sugar until light and fluffy, 3 to 5 minutes. Add the eggs, one at a time, until thoroughly incorporated. Beat in the orange zest and one-third cup juice. In a medium bowl, sift together the flour and baking powder. With the mixer running, slowly add the flour mixture until combined to form the cake batter. Fold in the chopped chocolate. Place the batter into a greased and floured 9-inch bundt pan, smoothing the top of the batter. (The batter will come slightly less than halfway up the sides of the pan.) Bake the cake until puffed and lightly browned on top and a toothpick or cake tester inserted comes out clean, 45 to 55 minutes. Remove from the oven and cool in the pan on a cooling rack, then remove from the mold. The finished cake will be about 3 inches tall in the center. While the cake is cooling, make the icing: In a medium bowl, sift the powdered sugar. Add the remaining 2 tablespoons orange juice and whisk to form the icing. Drizzle the icing over the cooled cake, then garnish with the candied orange.

Notes:

serves 12 Source: Los Angeles Times